From the Desktop of a Dreadlocked Multimedia Designer.
(Note: none of the links in this article are affiliate.)
 I’ll be honest from the get-go; figuring out how to create my first audio/video podcast was a bit more of an ordeal than I anticipated, mainly due to the vast amount of information out there on any given subject, as well as the numerous variations in technique that can be used to accomplish the same goal. Therefore, I’ll state up front that the steps I outline below are the actions I took to get my first podcast off the ground. It was my first time, and I don’t claim to know everything. The following steps worked for this dreadlocked multimedia designer (that would be me), but to get your podcast to work for you, you may have to make some slight modifications to get it just how you like it. For example, you may choose to start with higher end equipment than I did, which is fine. The good news is that the general steps you take and principles you follow in the beginning are largely the same (whether you’re on a Mac or PC), and that once you get through the initial pain of figuring out how to record audio/video and how to find a proper place to host the huge files and how create a “feed” (okay, take a deep breath), most of the hard work is behind you. Then, you can focus on creating great content and reaping the benefits!
1. Recording Audio
 The first step to creating a good podcast is to have some good content, so bite the bullet and record your first episode. Don’t like the sound of your own voice? Welcome to the not-so-exclusive club. I’m on a Macbook Pro, and thus chose the simple software GarageBand to record one of my all-audio podcast episodes. Being on a budget, I have not yet purchased a high end external mic yet, but was pleasantly surprised at the high recording quality from the built in system of my computer. However, the sound quality of your podcast can make or break your podcast, so in general I would recommend purchasing a decent mic. It’s what I plan to eventually do, although my MacBook gives me better quality than many better established podcasts I’ve listened to in the past. James Bruce writes a very informative article exploring podcast mics and software in his article, “Starting a Podcast: The Best Recording and Equipment Platforms You Should Use.” You’ll find that for PC users, he recommends Audacity for audio recording purposes.
2. Recording Video (If You Want Video in Your Podcast)
 This will depend on your market. The decision to include video in my dreadlock podcast was done by necessity, seeing as my audience craves hair demonstrations and tutorials. Since I’m on a Macbook Pro, I chose iMovie, which I’m pretty sure comes with the computer when you buy it. It features drag and drop simplicity, while incorporating some neat intro features I haven’t had a chance to dabble in yet. It’s also worth mentioning that GarageBand ’11 also allows you to create movies. I haven’t tried that yet, but here’s an article on it if you’re interested. If you’re on a PC, Camtasia gets high reviews.
As for the 10 second intro to my video, I went to the website Fiverr.com and paid a whole $10 to have it created for me. Be careful when visiting this site, because it offers anything and everything you could ever want for $5. You will fall into the black hole of possibilities, and as soon as you begin to climb out, you’ll realize that many of the vendors offer add-ons for an additional fee, which is why my intro cost twice the normal amount. Still, $10 for a quality video intro is a steal, I’d say, and one less thing I had to worry about.
3. Hosting the Audio/Video on Amazon S3
 Over and over again, my research for a quality, low cost hosting solution kept leading me to Amazon S3, so I decided to give it a try. It’s full name is “Amazon Simple Storage Service”. It’s free to sign up, and will only charge you a cheap rate for what you actually use via their pricing tier. I personally started off on their Free Usage Tier, and will upgrade from there as necessary. And if you are familiar with the ins and outs of FTP, then you can handle this. If you already have an account with Amazon for shopping, it will allow you to keep the same username and password.
4. The Joy of Feedburner
This is what you will use to convert your content into a Feed, which is simply a collection of content and data that is updated on a regular basis, which is exactly what you need for your podcast. For my podcast, I chose to “burn a feed” to Feedburner with my WordPress site. Daniel J. Lewis explains the process well in How to Setup and Use Feedburner for Blogging or Podcasting.
5. Podpress – the Free WordPress Plugin for Podcasting
Reviews kept pushing towards Podpress, so that was my plugin of choice for hosting my podcast via WordPress. It gives you many options and automatically generates your feed (RSS2, iTunes and ATOM and XSPF playlist). Once you download and install the plugin, the options can be a bit overwhelming, so here’s a quick video from Tuneupyourweb on how to navigate it:
*Note: he chose to place his audio files in the main directory of his self hosted WordPress website’s server. If you are using Amazon S3 or another service, you will need to change the URL to your media files directory accordingly.
Another plug in I’ve heard mentioned is Blubrry, which has it’s own feed to iTunes. For more options and a breakdown on each, Rajeev Edmonds from FreshTechTips.com gives his 7 Best WordPress Plugin Reviews, which include Podpress and Blubrry.
6. Submitting to iTunes
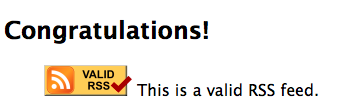
At this point, you are so, so very close. First, make sure that your feed is up and running. To do this, I went into the “Feed/iTunes” settings of Podpress and press the button that says “Validate Your Feed” under “” If you’re feed is all set, you’ll get the following message:
And if they have any recommendations for improving the structure of your podcast so that it will function correctly with a wide range of feed readers, it will lay those out for you, including where the issues show up in your XML feed.
After you’re done doing back flips in your office, you’ll want to run your feed through a second test. Copy your feed URL and head over to your iTunes application. Go to File –> “Subscribe to Podcast.” Enter your feed URL, click OK, and it should show the episodes present in your podcast. This is not officially submitting your podcast to iTunes, but will show you if your podcast feed is set up correctly. If your episodes don’t show up, you’ve got a problem (as was my case a couple times. I went back to Podpress and quickly realized I had inserted the incorrect URL to my Amazon S3 media files directory). If your episodes do show up, move to the next step of officially submitting your podcast to iTunes via there store.
Make sure you’re logged into iTunes, and go to the iTunes store. From there, click on “Podcasts” from the top navigation bar. You will see the “Podcast Quick Links” on the right side. Click “Submit a Podcast” from the list, and follow their simple instructions. They even give you a preview of what the summary view of your podcast will look like. If you’ve done everything correctly, the image you selected to be your square icon should show up, as well as the title of your podcast, summary, etc. After you have finally submitted, you will get this nifty message:
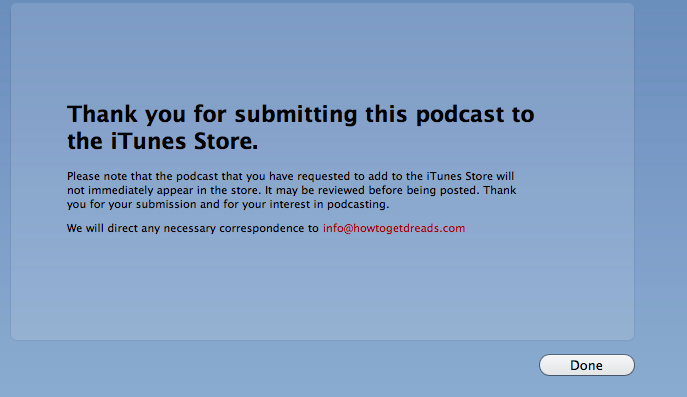
For my podcast, they took days, which felt like an eternity. I submitted on a Sunday, and didn’t hear back until Wednesday that it had actually been accepted. And then it still took a couple more days for it to actually show up in the iTunes store. Yeesh.
7. Creating More Podcast Episodes
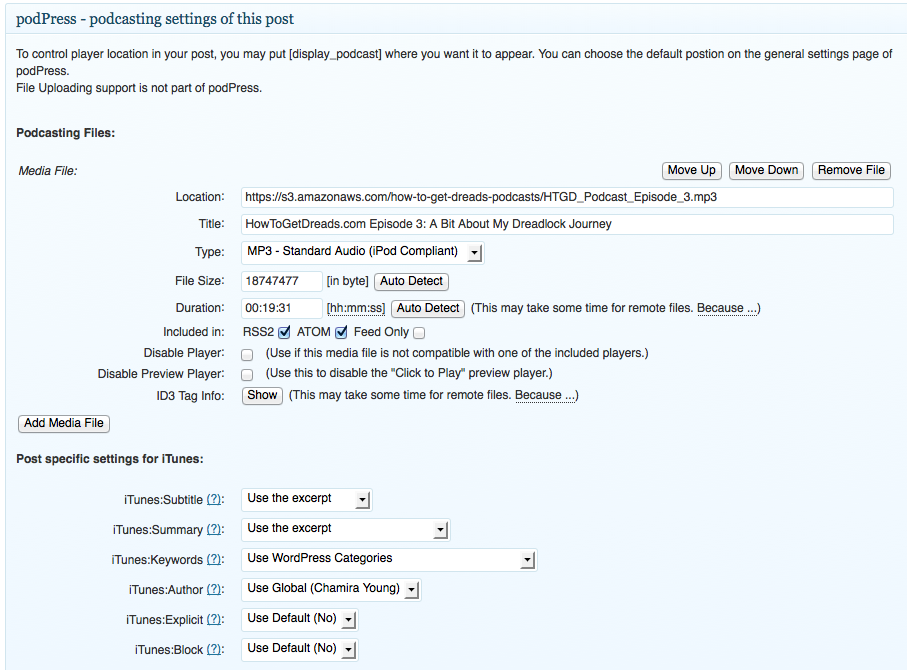
At this point, adding more podcast episodes is as simple as writing a new WordPress blog post. Really. Go and create a new post. Give it a title and description like you would any normal post. Write whatever you want to say in the main editing box. After that, scroll down to the bottom of your page and you should have an additional podPress settings area waiting for you. Fill it in with the appropriate info (see image below), such as the url of the location of your media file, the title, and the file size and duration. For some, the file size and duration are automatically detected (never for me). Once you’ve filled in the basic info, publish your post. The new episode will be picked up by your feed, and your new post will feature a cute little audio player so that people can listen directly from your site, if they so choose. If you used video, than a video player will appear in your post.
Final Thoughts
That wasn’t so bad, right? The good thing is, once you complete the steps to set up your feed and get it submitted to iTunes, the process is much simpler moving forward because you can focus on creating awesome content. And as you create this awesome content, remember to inject your personality into your podcast. Be yourself, show your quirks, and just have fun!
Additional Resources:
»For iTunes’ extensive write up and information on podcasting (it gets technical, which you will eventually want), click here.
»My podcast, which led to the creation of this post: How To Get Dreads Podcast
Article Update
Daniel Lewis, who I reference in Step #4 above, had some additional input for us (originally from his comment below this article). Thanks, Daniel! Very astute observations. Here are his words:
I now highly recommend against using FeedBurner, especially with its future in question. FeedBurner is not at all required for podcasting, and its stats are highly inaccurate. If you use PowerPress or even podPress on your site, then you have enough to have a podcast feed.
I also recommend PowerPress over PodPress. PowerPress is developed so much better and is easier to use.